How to Properly Clean Your Keyboard, Mouse, and Monitor

You've invested time and money into creating the perfect desk setup, but there's one crucial step that's often overlooked: cleaning. Over time, your keyboard, mouse, and monitor become magnets for dust, crumbs, fingerprints, and grime.
This doesn't just look bad; it can affect the performance and shorten the lifespan of your expensive gear. A deep clean is the most overlooked step for peak performance and a key part of maintaining a clean desk setup. This tech cleaning guide will walk you through the right way to de-gunk your peripherals.
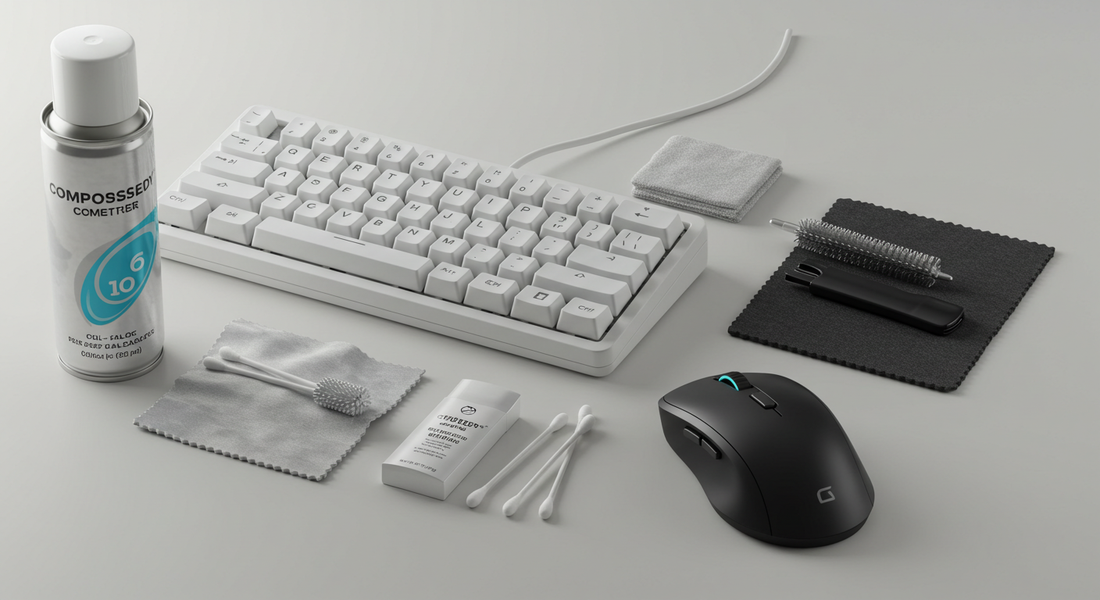
Your Toolkit
Before you start, gather the right tools. Using the wrong supplies (like paper towels on a monitor) can do more harm than good.
-
Compressed Air: Essential for blasting dust and debris from hard-to-reach places.
-
Microfiber Cloths: The only thing you should be using to wipe down your monitor and sensitive surfaces.
-
Isopropyl Alcohol (70%): A safe and effective disinfectant for most electronics.
-
Keycap Puller: A must-have for a deep keyboard clean.
-
Small Brush or Detailing Brush: For scrubbing away stubborn grime.
-
Cotton Swabs: Perfect for cleaning in between keys and tight corners.
-
Optional: Cleaning Gel/Putty: A fun and effective way to pick up dust from your keyboard.
The Deep Clean, Step-by-Step
Always unplug your devices before you begin cleaning.
A. The Keyboard: From Keycap Removal to De-Gunking
Your keyboard is likely the dirtiest item on your desk. Here's how to clean keyboard properly.
-
Take a "Before" Picture: This is a crucial first step! It will be your map for putting the keycaps back in the right order.
-
Blast with Air: Turn the keyboard upside down and use compressed air to dislodge any loose debris.
-
Remove Keycaps: Use your keycap puller to gently remove all the keycaps. For larger keys like the spacebar, be mindful of the stabilizer bars underneath.
-
Clean the Keycaps: Place the keycaps in a bowl of warm water with a few drops of dish soap. Let them soak, then use a small brush to scrub away any grime. Rinse them thoroughly and lay them out on a towel to dry completely.
-
Clean the Board: With the keycaps off, use compressed air again to clear out the newly exposed areas. Use a cotton swab lightly dampened with isopropyl alcohol to clean the plate between the switch housings.
-
Reassemble: Once the keycaps are 100% dry, press them back onto the switches, using your "before" photo as a guide.
B. The Mouse & Mousepad: Eliminating Hidden Grime
Your mouse picks up oils and dirt from your hand every day.
-
Wipe Down the Body: Use a microfiber cloth lightly dampened with isopropyl alcohol to wipe down the entire surface of the mouse.
-
Clean the Nooks and Crannies: Use a toothpick or the tip of a brush to gently clean out the seams and around the scroll wheel.
-
Clean the Sensor: Use a dry cotton swab to gently wipe the optical sensor on the bottom of the mouse.
-
Wash the Mousepad: Most cloth mousepads can be hand-washed in a sink with warm water and a little soap. Rinse thoroughly and hang to air dry. For hard mousepads, a simple wipe-down with a damp cloth is all that's needed.
C. The Monitor: The Right Way to a Streak-Free Screen
Never, ever use paper towels or harsh chemical cleaners (like Windex) on your monitor.
-
Dry Wipe First: Turn off the monitor. Use a clean, dry microfiber cloth to gently wipe the screen in a circular motion to remove dust.
-
Dampen if Necessary: For stubborn smudges or fingerprints, lightly dampen a different, clean microfiber cloth with a small amount of distilled water. Never spray water directly onto the screen.
-
Gently Wipe: Gently wipe the screen with the damp cloth, followed immediately by a final wipe with a dry microfiber cloth to prevent streaks.
Conclusion: A Maintenance Routine for Long-Lasting Gear
A clean set of peripherals not only looks better but feels and performs better. Make this deep clean a part of your quarterly maintenance routine.